AWS Lambda Tutorial: Step by step instructions to create a scalable web application – Part 2
Arunbalan
January 27, 2016

Nuts and Bolts
This application gives a complete overview of how to use AWS resource (such as DynamoDB and RDS) with Lambda and how to return an HTML page as a response to every incoming request. Here we are using Amazon RDS for storing user’s account information and Amazon DynamoDB for storing user’s status information. The web app is stored in Amazon S3. It is important to note that EC2 is not used. Hence there is no reserved infrastructure.
Note: There is no need to use both RDS and DynamoDB simultaneously. This example is using both to show that lambda can interface with both.
We will create 3 lambda functions and invoke these functions from separate API endpoints. The Lambda functions are
- CreateAccount : This function is used to create an account for the user by receiving username and password.
- UpdateStatus : This function receives username, password and status from the user. And update the status after authentication.
- GetAllStatus : This function authenticates users and list status of every user.
You are just few steps away from creating your Lambda application.
STEP 1: BEFORE YOU USE AWS LAMBDA FOR THE FIRST TIME, COMPLETE THE FOLLOWING TASKS:
- Go to the website https://aws.amazon.com/
- Sign up for AWS.
STEP 2: CREATE AMAZON RDS MYSQL AND DYNAMODB DATABASES.
a. Create and configure RDS MySQL database instance
- Go to the Amazon RDS console page. https://console.aws.amazon.com/rds/home .

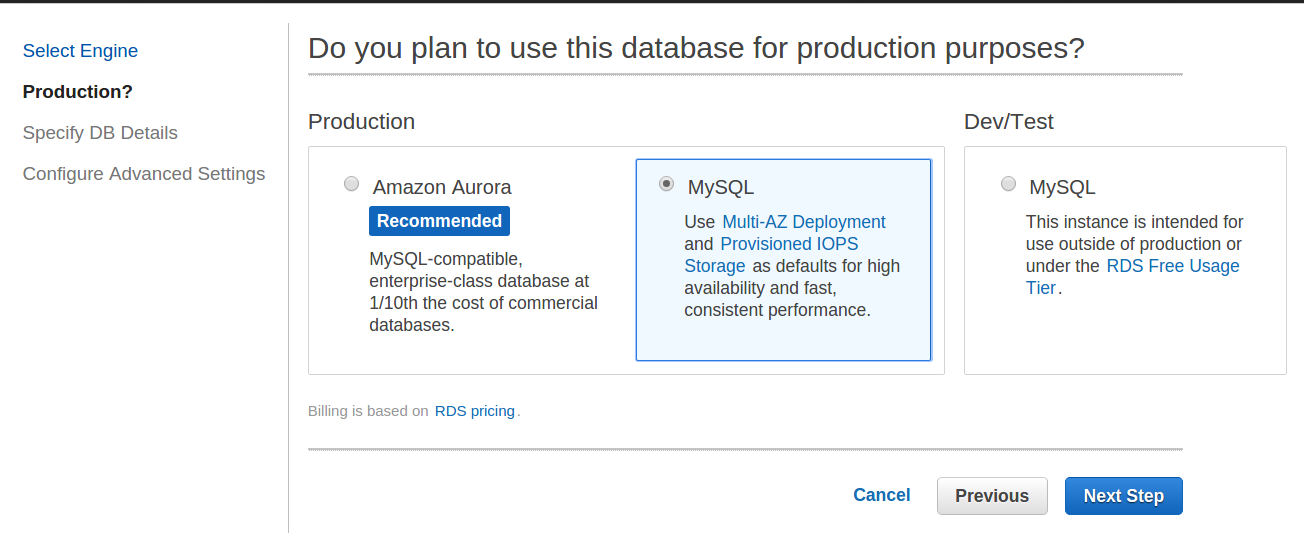
- Click on Launch a DB Instanceand Select MySQL database engine.
- In Production panel select Second Option MySOL – use Multi-AZ Deployment and Provisioned IOPS Storage as defaults for high availability and fast, consistent performance. Click next button.

- Specify database details in next step. Modify database instance class as you need. Here we select db.t2.micro and availing Multi-AZ Deployment. Under the settings give database name, username and password.

- Note down these RDS credentials,which are required to make DB connection from NodeJS script.
- Here comes an important configuration setup. In this page given below you should make the database publically accessible. And choose VPC and default VPC Security group. Then give a name to your database. Then click Launch DB Instance.

- Then your database will be created. You will get the endpoint address from the properties of that instance.
- Install mysql client and connect to this database using endpoint address, username and password. And add the schema given in our github. (in this demo application. We created a table named as ‘login’ and add three fields >UserId , name and password. UserId is auto incremented and name is the Primary key).
- Download the schema of RDS database available in github to your system. Open terminal and type commands as in following formate to import schema to RDS.
mysql -h RDSEndPointAddress -P 3306 -u username -p databasename < PathTORDSdatabaseSchema.sql
For example
mysql -h lambdaInstance.cukvxrgt8kqg.us-east-1.rds.amazonaws.com -P 3306 -u user -p lamdaApp < RDSdatabaseSchema.sql
Give password.It will configure your database.
b. Create DynamoDB Table.
- Go to this link https://console.aws.amazon.com/dynamodb/home and select Create Table option. You will get the following screen. Choose a name for your table and Choose a primary key type. You can choose whatever name you like. For this application we created table lambdaApp. This table name is required to connect with DynamobDB from Nodejs script. So note down this table name. Here we are choosing hash for primary key and our hash attribute name is UserId. Then Click Continue.

- On the next page we have not configured the indexes . Leave this page as is.
- Next page you can configure the throughput capacity. This can be done according to the requirements.
- In the final page you can enable basic alarm for your table. Provide your email id to get the notification. Press Continue.
- Now you can review your table configuration and create the table. After some time the table will be in the active state. Then you can use the database from our lambda function by requesting with the table name and hash primary key.
- Click on the table name then it will open the table status. see the below image.

- Then go to the Item tab and press Create Item button. then following window will pop up.

- click on the plus( + ) button ,it will show three options, select the Append option then select String from the dropdown list.
- After this you can add the items. In this application we use 3 items. The UserId is already created. so add Name and Status to this table then save it.


Thomas
Great post! Have nice day ! 🙂 c22ex
Subhanu
Stuck at connecting the rds instance to the mysql client, would please want help